

一、Astro和fuwari介绍
1、什么是 Astro?
Astro是一个现代化的静态站点生成框架,其核心目标是帮助开发者创建快速、轻量、且以内容为核心的网站。它于 2021 年首次发布,由于其独特的设计理念和对性能的极致追求,迅速在开发者社区中崭露头角。
Astro 的特性不仅专注于生成高性能的静态网站,还致力于降低开发门槛,同时提供与现代前端需求兼容的技术栈支持。这使得它成为博客站点、文档网站、甚至复杂 Web 项目的理想选择。
2、Astro 的独特设计理念
Astro 的开发核心理念可以用一句话概括:“Ship less JavaScript”(更少的 JavaScript 输出)。这意味着 Astro 会尽可能地减少前端 JavaScript 的加载,提供近乎纯静态的 HTML 页面,从而极大提升网站加载速度和用户体验,尤其适合内容导向型的站点,如博客、文档和营销页面。
Astro 引入了一个非常独特的架构设计 —— 群岛架构(Islands Architecture): 在传统的静态站点中,页面通常是完全静态的;而在现代动态站点中,许多部分过度依赖 JavaScript。Astro 提供了一种两者兼得的方式:你可以定义页面中哪些部分是静态的(如文章内容),哪些部分是动态可交互的(如评论系统或搜索栏)。这种架构在提高性能的同时,确保了站点的交互能力。
3、Astro 的核心特点
- 零 JavaScript 默认输出: 与传统框架(如 React、Vue)相比,Astro 默认不会输出多余的 JavaScript,仅生成纯静态的 HTML 和 CSS。这种轻量化的特性能显著减少浏览器的负担,使页面加载速度更快。
- 支持多种框架: Astro 拥有惊人的灵活性,它允许开发者在同一个项目中同时整合多种前端框架(如 React、Vue、Svelte 和 SolidJS)。你可以选择最适合问题域的工具,而无需被某一个特定框架所限制。
- 内容优先: Astro 是为内容驱动型网站设计的,特别适合博客、文档或新闻类项目。它能快速处理 Markdown 和 MDX,开发者可以轻松地将内容与组件结合。
- 开箱即用的开发体验: Astro 提供了许多默认特性,如文件路由(File-based Routing)、内置的 Markdown 支持、静态资产优化、自动图片处理等;即使是不熟悉前端开发的用户,也能快速上手。
- 扩展能力: Astro 拥有丰富的插件生态系统,可以轻松扩展功能,比如支持 TypeScript、Tailwind CSS、PWA 等技术栈。您还可以无缝接入第三方服务,比如 CMS 系统、数据库或者 API。
4、Fuwari主题介绍
Fuwari是基于 Astro 开发的静态博客模板。
TIP
“ふわり (fuwari) ” 是一个日文词汇,常用来描述某种动作、感觉或状态,意境整体偏向轻柔、舒适、飘逸、无负担感,常用于描绘自然风景或者精致、柔和的物品与情感,是一个充满日语美感的拟声词/副词。

5、✨Fuwari功能特性
- 基于 Astro 和 Tailwind CSS 开发
- 流畅的动画和页面过渡
- 亮色 / 暗色模式
- 自定义主题色和横幅图片
- 响应式设计
- 评论
- 搜索
- 文内目录
二、部署教程
1、准备工作
Tip
可以直接在Github上直接修改,不想本地开发的话可以跳过下列步骤
- 进行本地开发,Clone 新的仓库,执行
pnpm install和pnpm add sharp以安装依赖- 若未安装 pnpm,执行
npm install -g pnpm
- 若未安装 pnpm,执行
- 通过配置文件
src/config.ts自定义博客 - 执行
pnpm new-post <filename>创建新文章,并在src/content/posts/目录中编辑 - 修改完后执行
pnpm build构建页面 - 在执行完上述命令后,你可以通过
pnpm dev命令启动本地开发服务器,访问http://localhost:4321进行预览。
2、博客自定义
1. 博客配置
你可以通过配置文件 src/config.ts 自定义博客,这里以我自己的配置文件为例:
博客基本内容:
export const siteConfig: SiteConfig = {
	title: "imxizhenのBlog",
	subtitle: "小刘的碎碎念.",
	lang: "zh_CN", // 在这里设置你的博客默认语言 : 'en', 'zh_CN', 'zh_TW', 'ja', 'ko', 'es', 'th'
	themeColor: {
		hue: 250, // 在这里设置你的主题色; Default hue for the theme color, from 0 to 360. e.g. red: 0, teal: 200, cyan: 250, pink: 345
		fixed: false, // 选择是否固定主题色 默认false; Hide the theme color picker for visitors
	},
	banner: {
		enable: true,
		src: "assets/images/banner.webp", // 在这里设置你的首页横幅图片; Relative to the /src directory. Relative to the /public directory if it starts with '/'
		position: "center", // 在这里设置你的横幅图片位置; Equivalent to object-position, only supports 'top', 'center', 'bottom'. 'center' by default
		credit: {
			enable: false, // 这里可以设置你的横幅图片的作者信息; Display the credit text of the banner image
			text: "", // Credit text to be displayed
			url: "", // (Optional) URL link to the original artwork or artist's page
		},
	},
	toc: {
		enable: true, // 这里可以设置是否显示文章目录; Display the table of contents on the right side of the post
		depth: 2, // 文章目录默认显示到2级; Maximum heading depth to show in the table, from 1 to 3
	},
	favicon: [
		// Leave this array empty to use the default favicon
		// {
		//   src: '/favicon/icon.png',    // Path of the favicon, relative to the /public directory
		//   theme: 'light',              // (Optional) Either 'light' or 'dark', set only if you have different favicons for light and dark mode
		//   sizes: '32x32',              // (Optional) Size of the favicon, set only if you have favicons of different sizes
		// }
	],
};
个人信息与联系方式:
export const profileConfig: ProfileConfig = {
	avatar: "assets/images/avatar.jpg", // 个人头像; Relative to the /src directory. Relative to the /public directory if it starts with '/'
	name: "imxizhen",
	bio: "爱国 敬业 诚信 友善",
	links: [
		{
			name: "Bilibili",
			icon: "fa6-brands:bilibili", // Visit https://icones.js.org/ for icon codes
			// You will need to install the corresponding icon set if it's not already included
			// `pnpm add @iconify-json/<icon-set-name>`
			url: "https://space.bilibili.com/197527363",
		},
		{
			name: "GitHub",
			icon: "fa6-brands:github",
			url: "https://github.com/imxizhen",
		},
	],
};
2. 创建文章
Astro框架是基于Markdown的,所以你可以在src/content/posts/目录中创建新的Markdown文件,编辑文章内容。 你也可以在终端中执行 pnpm new-post 创建新文章,并在 src/content/posts/ 目录中编辑。
文章抬头
---
title: My First Blog Post   //文章标题
published: 2023-09-09   //文章发布日期
description: This is the first post of my new Astro blog.   //文章描述
image: ./cover.jpg   //这是文章封面,路径可以是相对路径,也可以是绝对路径
tags: [Foo, Bar]   //文章标签
category: Front-end   //文章分类
draft: false   //是否为草稿
lang: jp   //仅当文章语言与 `config.ts` 中的网站语言不同时需要设置
pinned: false   //仅在帖子置顶时设置
---
3、 部署
如果你的博客基本信息已经设置完成,文章也已经迁移/创建好了,你可以选择参考官方指南将博客部署至 Vercel, Netlify, GitHub Pages 等;部署前需编辑 astro.config.mjs 中的站点设置。
具体来说,你可能需要修改 astro.config.mjs 文件的 site 配置(大约在24行左右),将其设置为你的域名。
// https://astro.build/config
export default defineConfig({
  site: "https://www.imxizhen.asia/", // 修改为你的域名
  base: "/",
  trailingSlash: "always",
  integrations: [
    tailwind(
        {
          nesting: true,
        }
    ),
1. 部署到 Vercel
部署到Vercel非常简单,默认情况下你的 Astro 项目是一个静态站点。你无需任何额外配置即可将静态 Astro 站点部署到 Vercel。
- 首先,将你的博客全部代码push到你的GitHub仓库,然后在Vercel里选择import from GitHub
- Vercel将将自动检测 Astro 项目并自动为其配置正确的设置,一路点点点就行了
- 部署后,你可以通过
https://{Your username}.vercel.app访问你的博客,也可以在settings里设置自定义域名
2. 部署到 Cloudflare Pages
Cloudflare Pages是一个免费的静态网站托管平台,你可以在这里部署你的Astro站点。在开始之前,你需要:
- 一个 Cloudflare 账号。如果你暂时还没有,你可以现在免费去Cloudflare 官网注册一个。
- 你的源代码存储在一个 GitHub 或者 GitLab 仓库里。
部署流程:
- 在 Cloudflare Pages 设置一个新项目。
- 将你的代码提交到一个 Git 仓库中 (GitHub, GitLab)。
- 登录 Cloudflare Dashboard 并在 Account Home > Workers & Pages > Overview 选择你的账号。
- 选择 Create application,然后选择 Pages 标签页,接着选择 Connect to Git 选项。
- 选择你想部署的 Git 项目并点击 Begin setup(初始设置)。
- 使用以下的构建设置:
- Framework preset(框架预设): Astro
- Build command(构建命令): npm run build
- Build output directory(构建输出目录): dist
- 点击 Save and Deploy(保存并部署)按钮。 最后,你可以通过
https://.pages.dev访问你的博客,也可以在settings里设置自定义域名。
3. 部署到 GitHub Pages
你可以使用 GitHub Actions 将 Astro 站点自动构建和部署到 GitHub Pages。为此,你的源代码必须托管在 GitHub 上。Astro 维护了一个官方的 GitHub Action withastro/action 来帮助你部署项目。
由于本节流程比较复杂,请直接参见官方文档
4. 部署到 Netlify
如果你的项目存储在 GitHub、GitLab、BitBucket 或 Azure DevOps 中,你可以使用 Netlify 的网站用户操作界面来部署你的 Astro 网站。
在 Netlify dashboard 页面上,点击 Add a new site
选择 Import an existing project
当你从你的 Git 提供商中导入 Astro 仓库时,Netlify 应该会自动检测并预填充正确的配置设置。
确保已输入以下设置,然后按下 Deploy 按钮:
Build Command: astro build or npm run build
Publish directory: dist
部署后,你将被重定向到站点概览页面。在那里,你可以编辑你站点的详细信息。
根据你的部署配置,未来对源代码库的任何修改都将触发预览和生产部署。
三、托管到Cloudflare
1、首先需要购买一个域名
2、购买完成后到部署项目平台添加域名
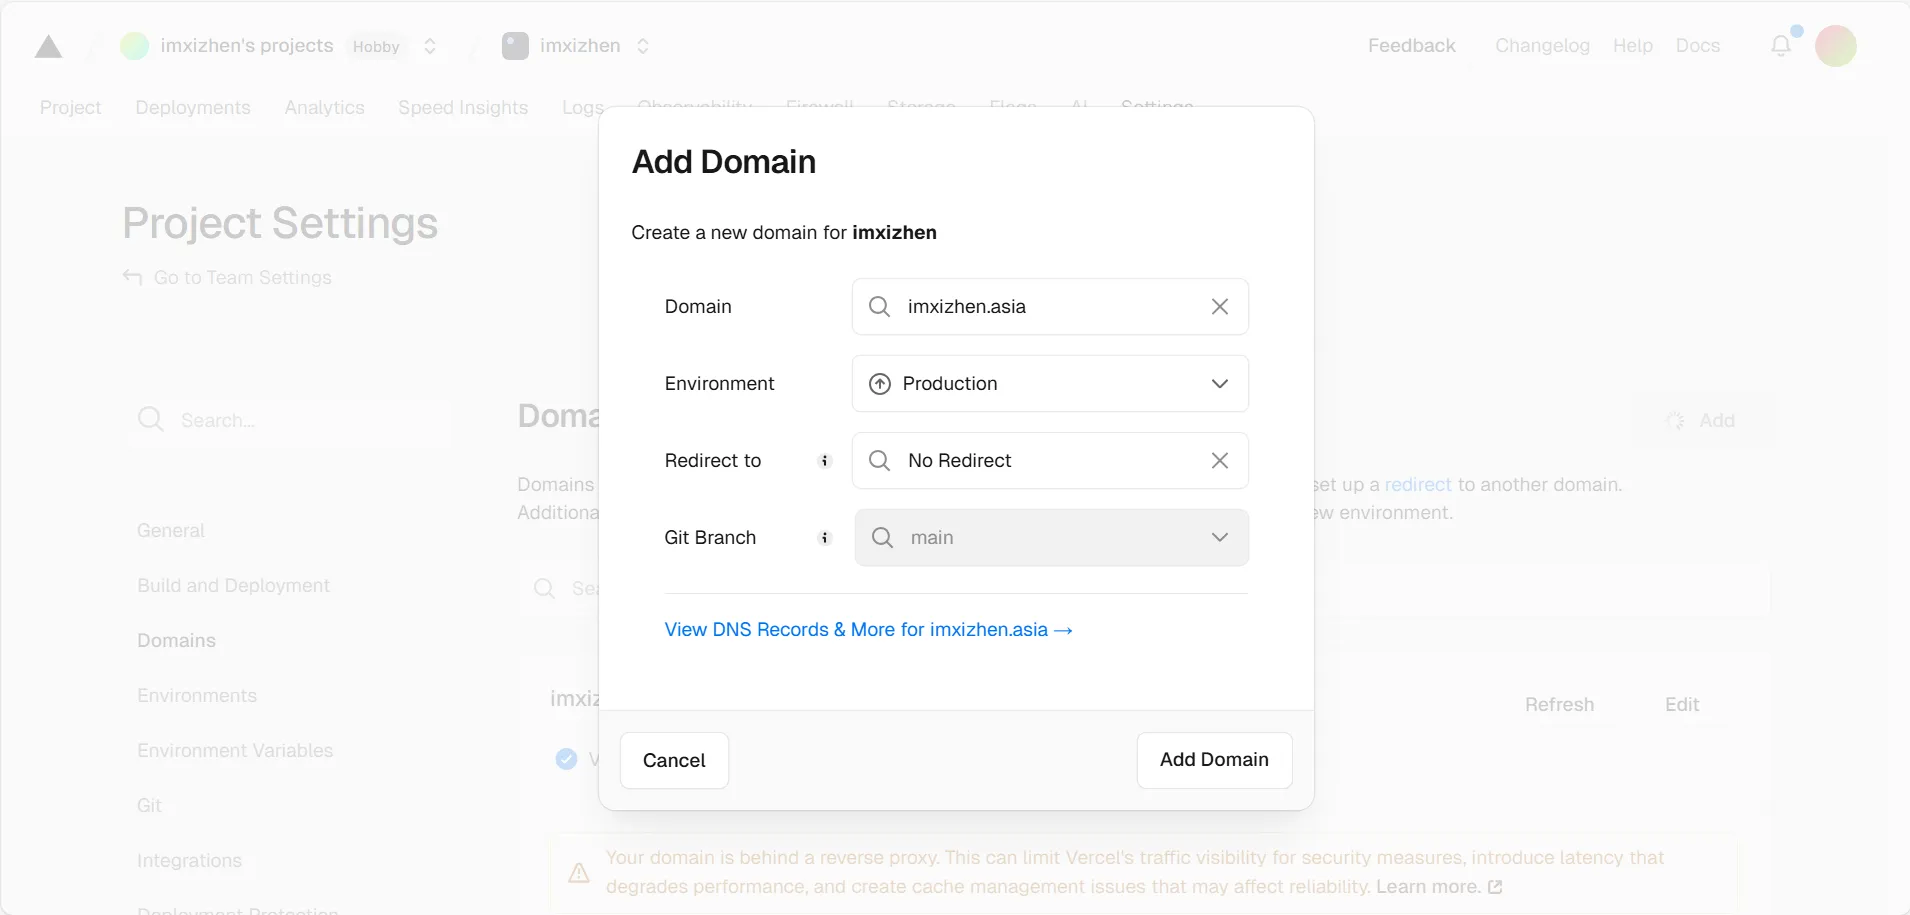
比如Vercel,Projects > Settings > Domains > Add,输入你的域名,默认添加即可 
3、托管到Cloudflare
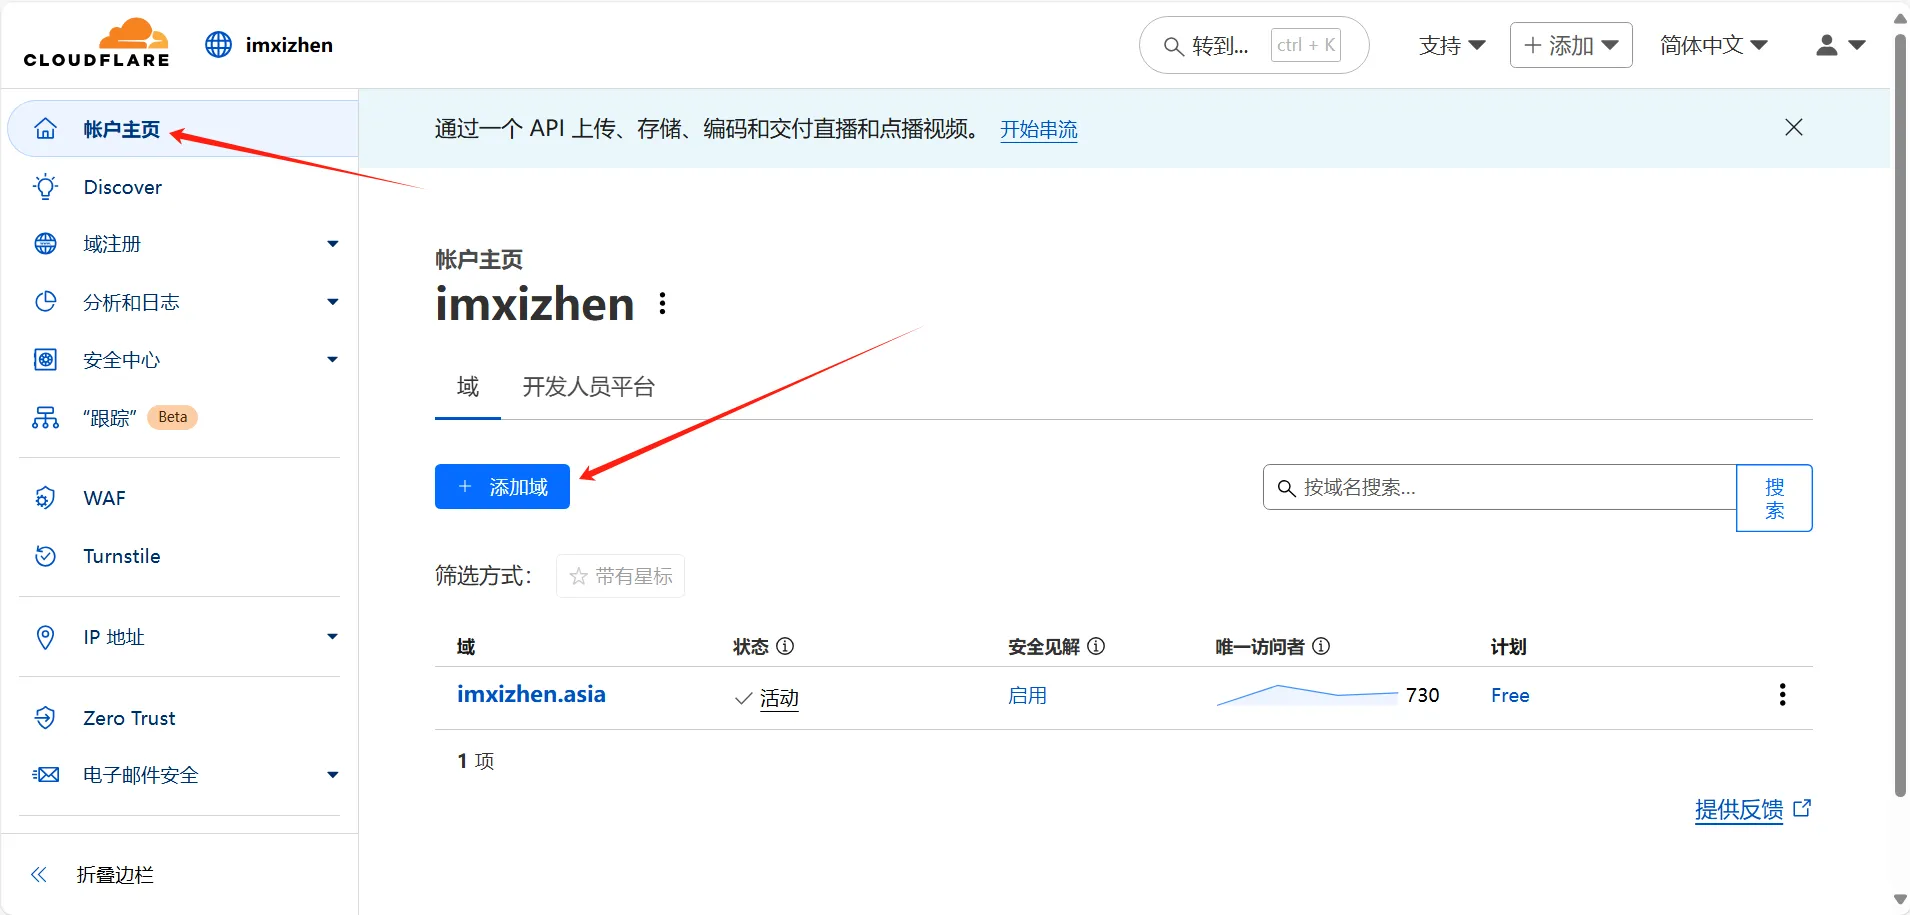
1. Cloudflare - 账户主页 - 添加域
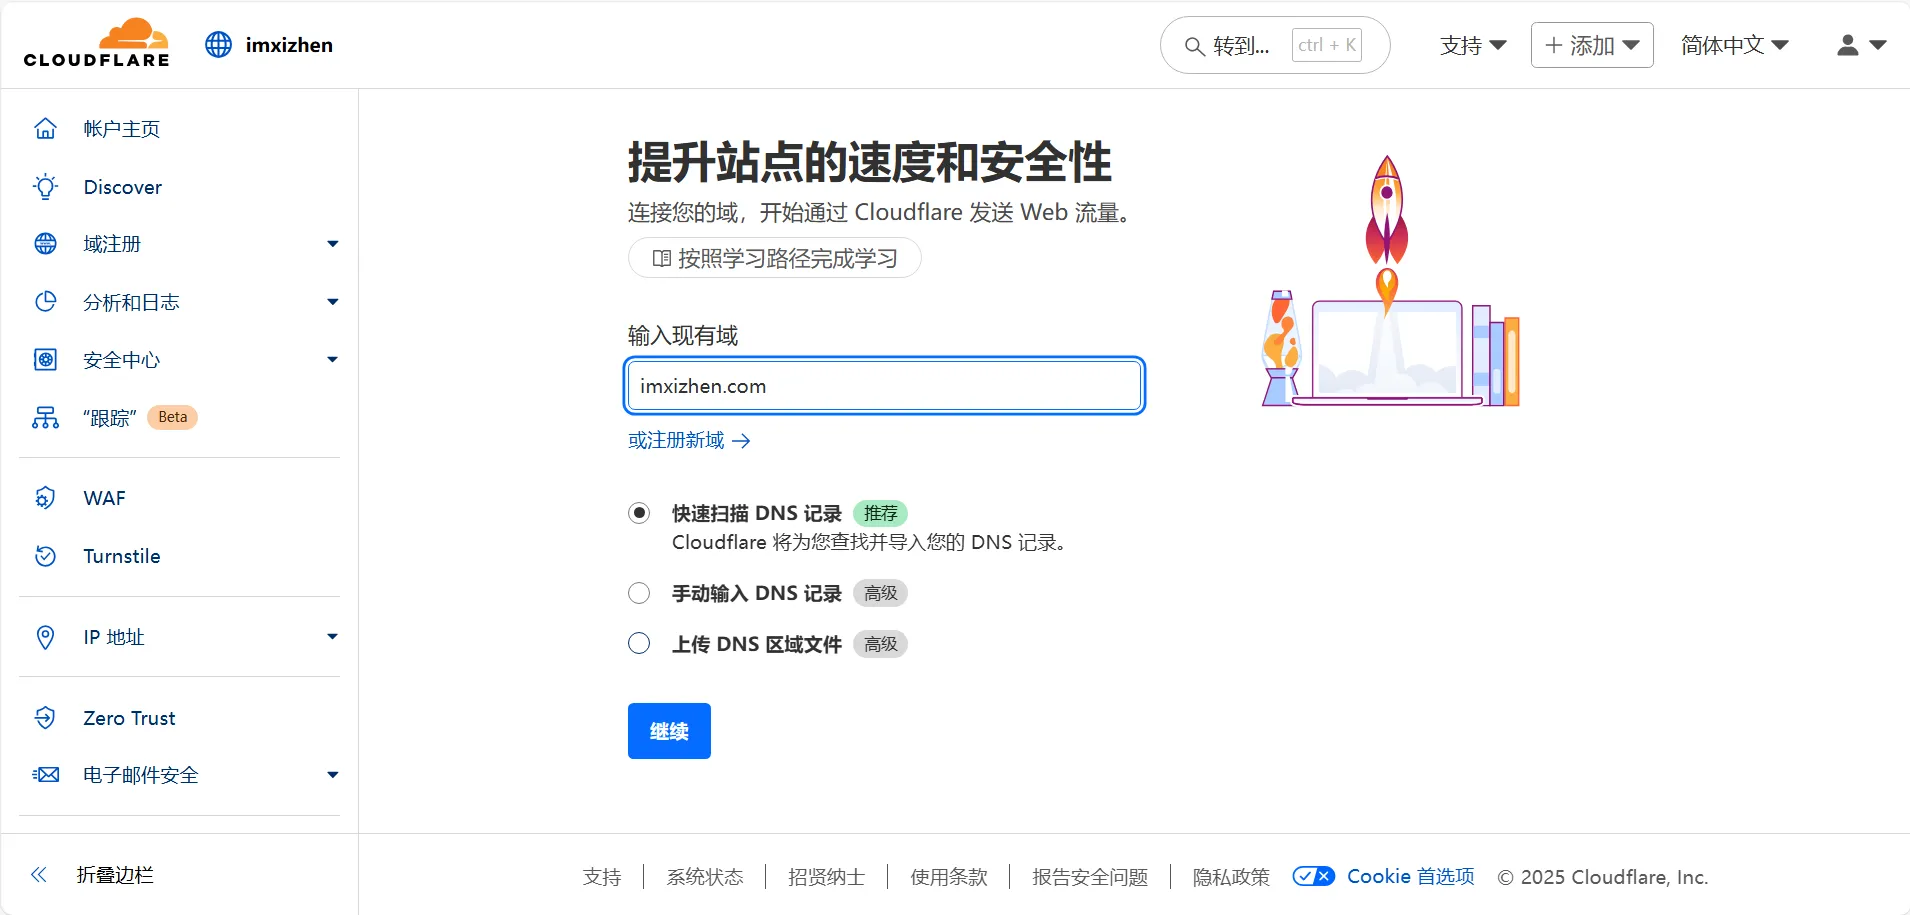
2. 输入你的域名-选择默认下一步
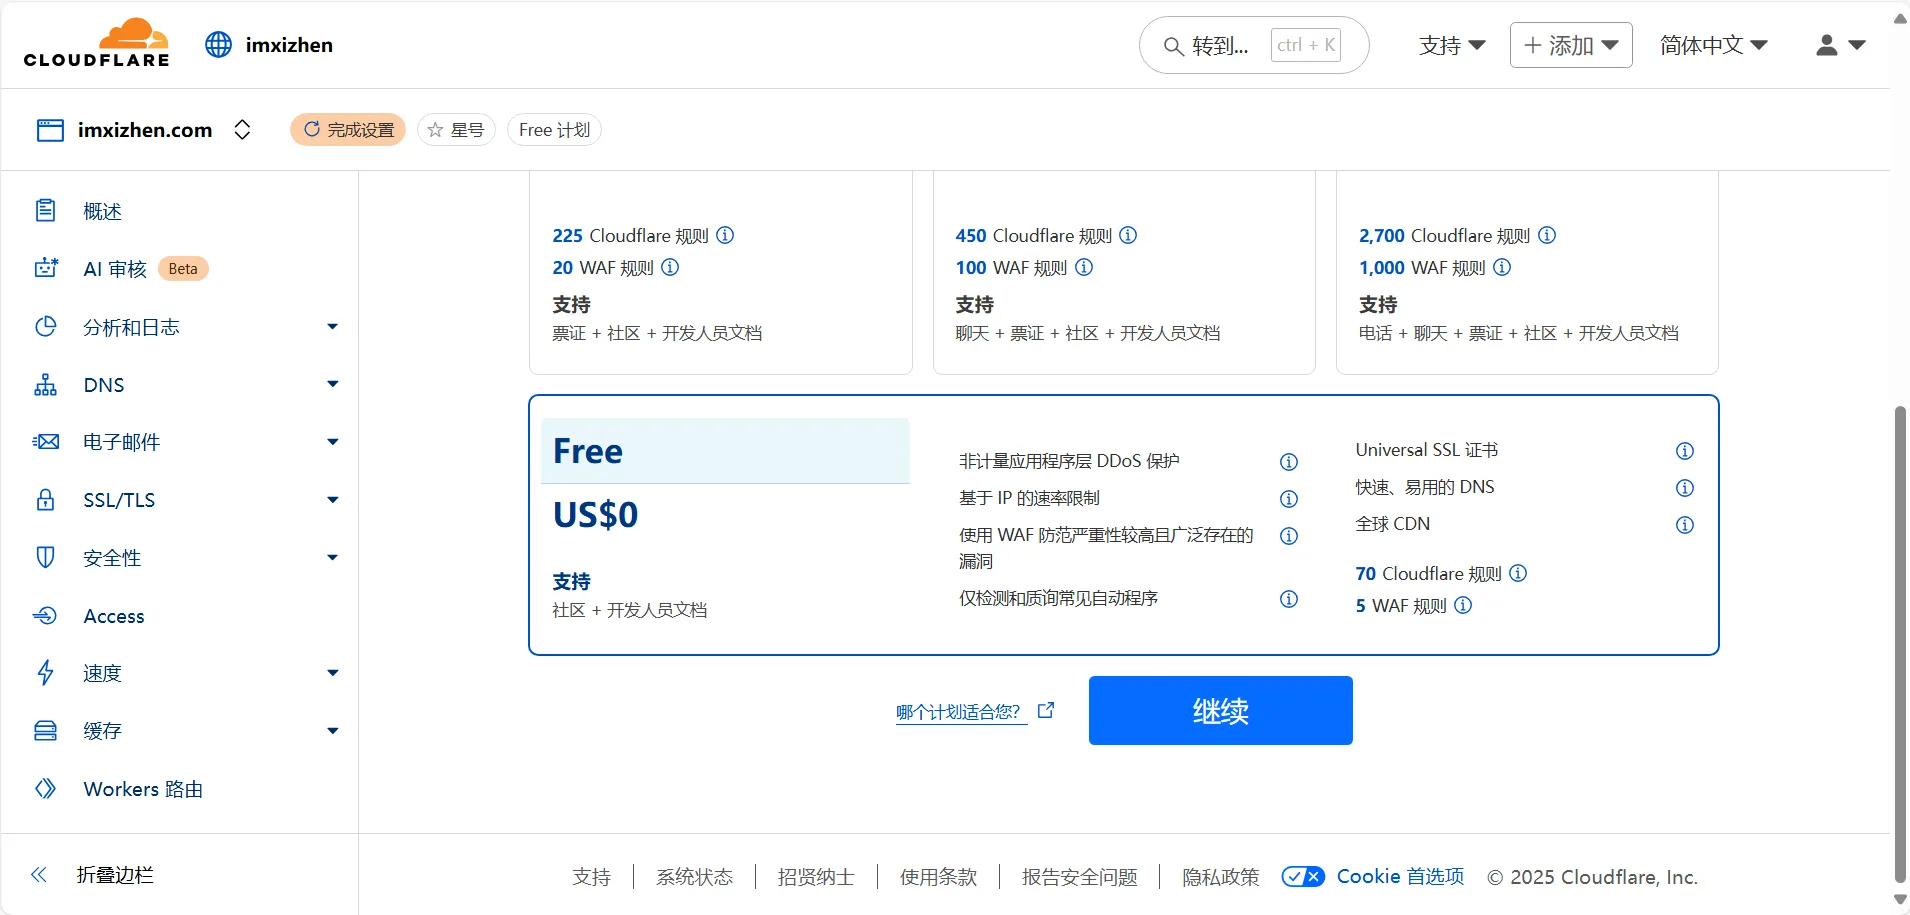
3. 选择Free计划,如果你有实力的话选付费计划也行
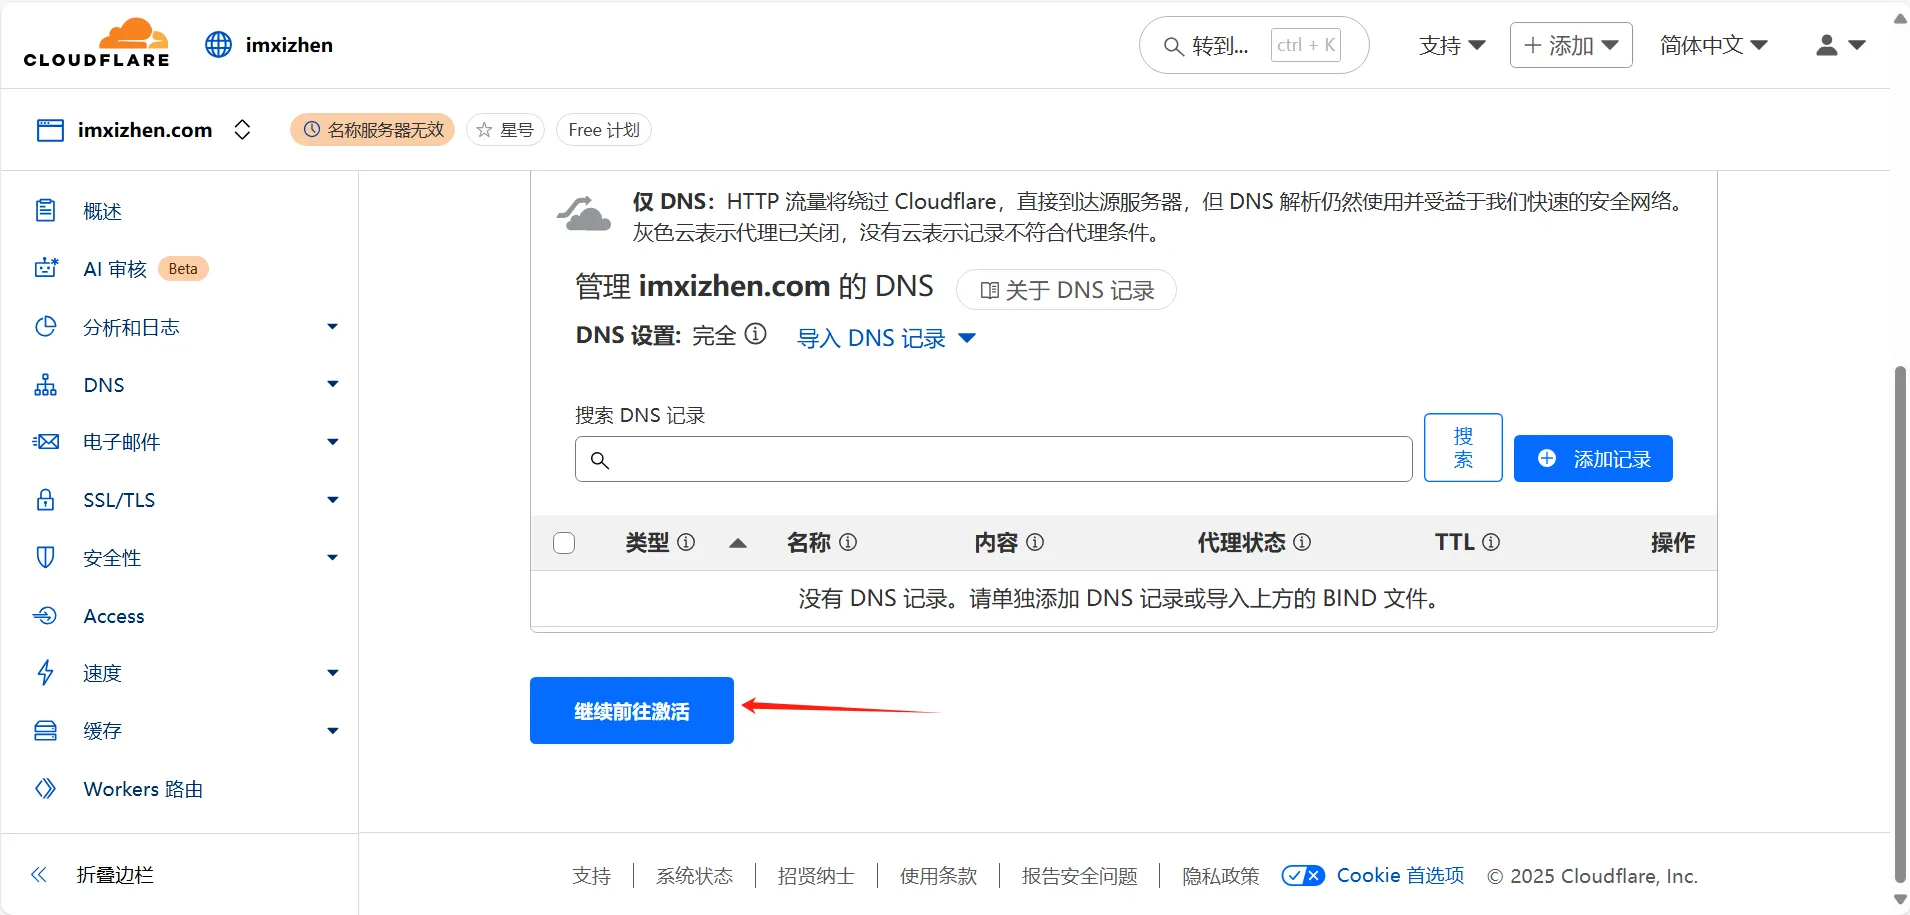
4. 这里需要填入Vercel指定的A记录地址(Vercel添加域名时会提示添加解析),然后继续前往激活
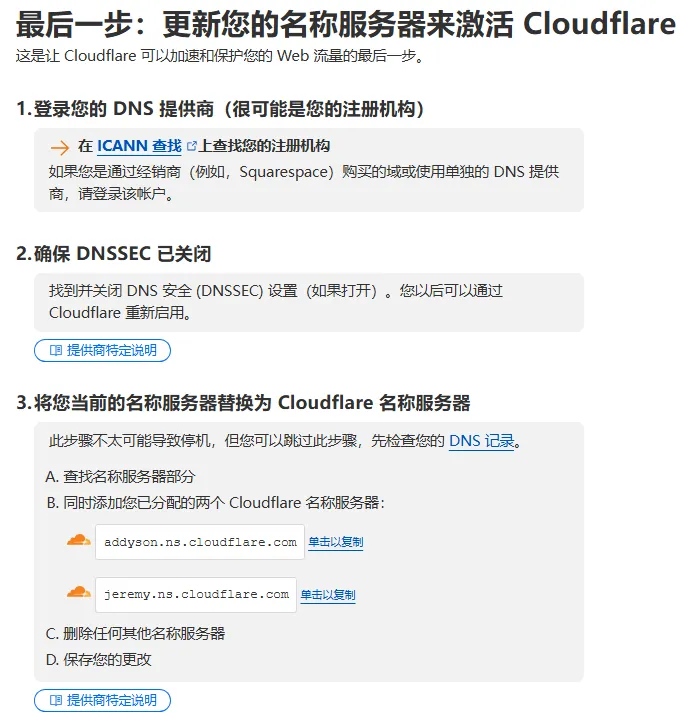
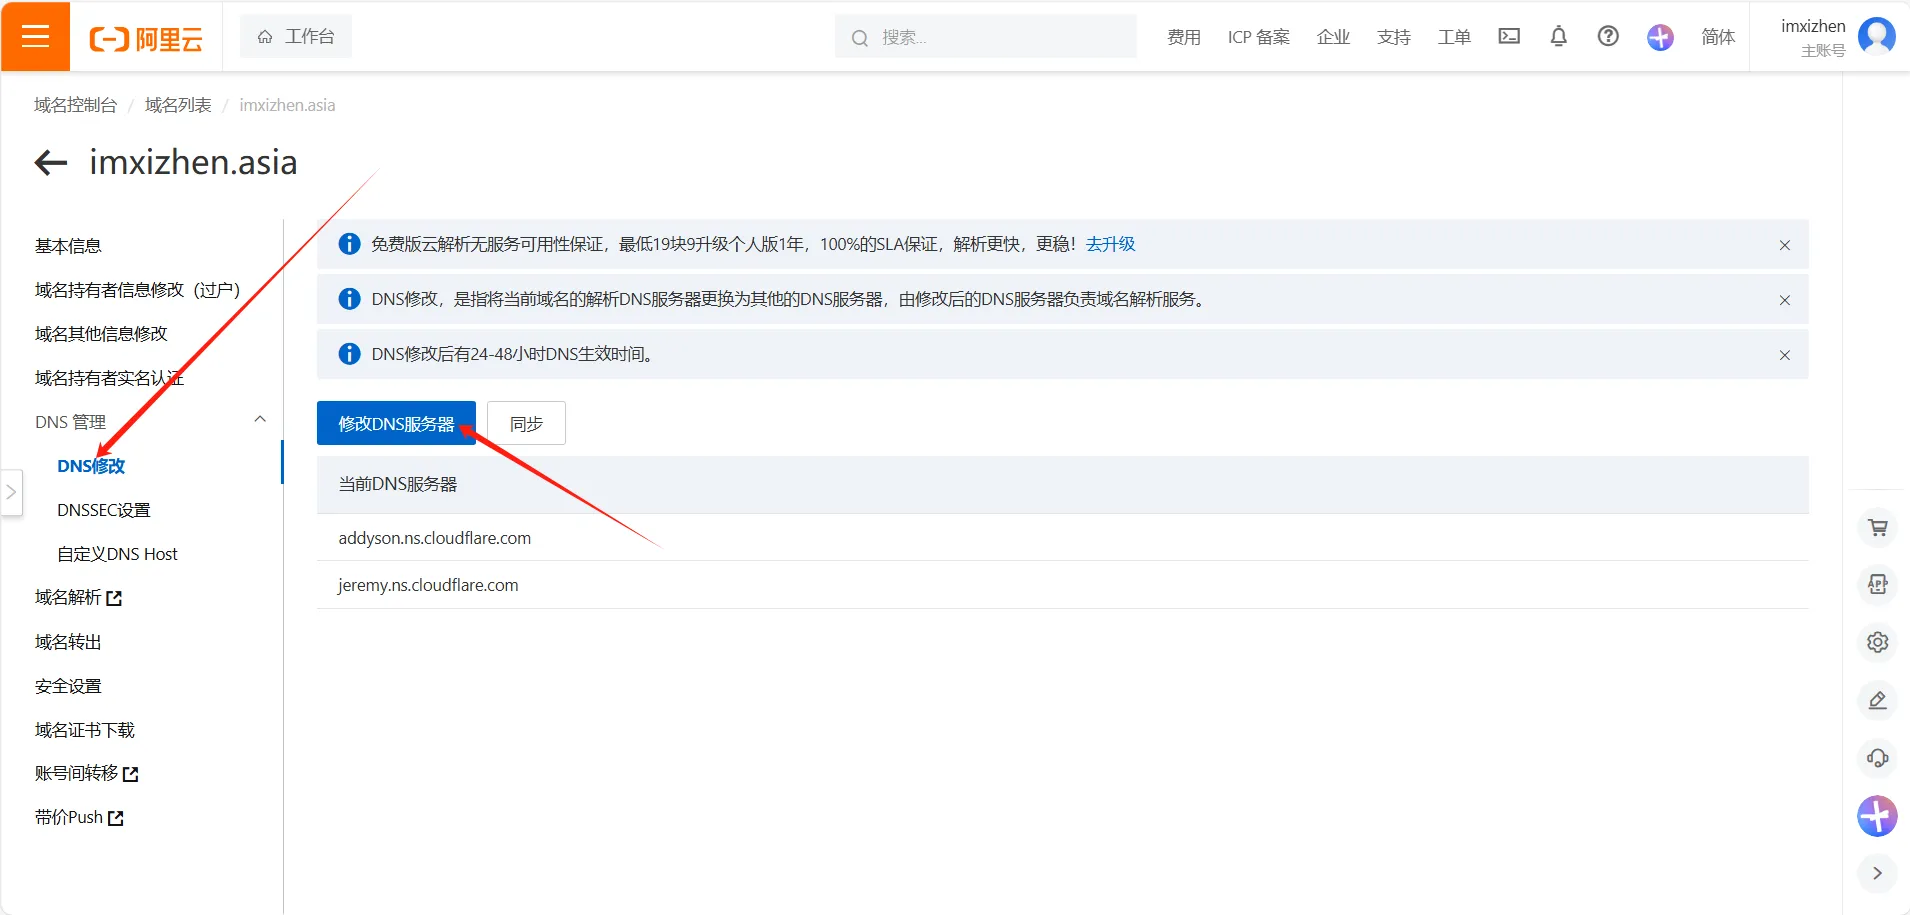
5. 最后一步,到域名购买平台设置dns服务器
6. 然后点击继续就完成啦
完成这些操作后需要等待DNS广播完成,通常需要十几分钟到半个小时左右,部分情况也会更慢。稍后Cloudflare主页里的域名状态显示为活动就是成功了。 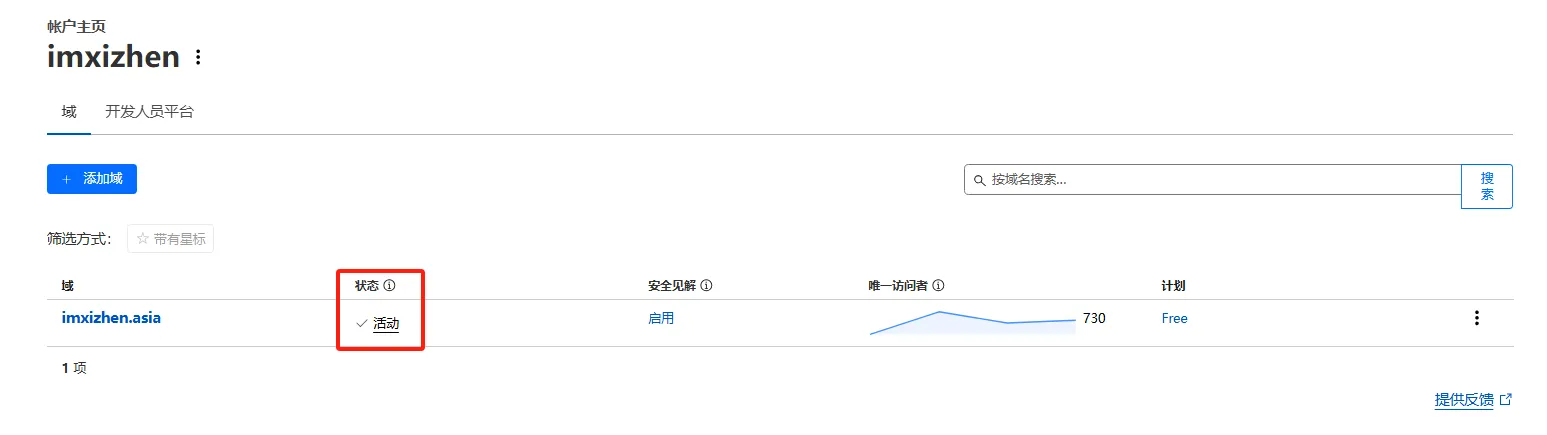
四、主题个性化调整
1、添加页脚ICP备案信息和运行时间信息
你可以在 src/components/Footer.astro 文件中添加你的ICP备案信息,例如:
---
import { profileConfig } from '../config'
import { url } from '../utils/url-utils'
const currentYear = new Date().getFullYear()
---
<!--<div class="border-t border-[var(--primary)] mx-16 border-dashed py-8 max-w-[var(--page-width)] flex flex-col items-center justify-center px-6">-->
<div class="transition border-t border-black/10 dark:border-white/15 my-10 border-dashed mx-32"></div>
<!--<div class="transition bg-[oklch(92%_0.01_var(--hue))] dark:bg-black rounded-2xl py-8 mt-4 mb-8 flex flex-col items-center justify-center px-6">-->
<div class="transition border-dashed border-[oklch(85%_0.01_var(--hue))] dark:border-white/15 rounded-2xl mb-12 flex flex-col items-center justify-center px-6">
<div class="transition text-50 text-sm text-center">
© <span id="copyright-year">{currentYear}</span> {profileConfig.name}. All Rights Reserved. /
<a class="transition link text-[var(--primary)] font-medium" target="_blank" href={url('rss.xml')}>RSS</a> /
<a class="transition link text-[var(--primary)] font-medium" target="_blank" href={url('sitemap-index.xml')}>Sitemap</a> /
<a class="transition link text-[var(--primary)] font-medium" target="_blank" href="https://www.travellings.cn/go.html">开往</a><br>
Powered by
<a class="transition link text-[var(--primary)] font-medium" target="_blank" href="https://astro.build">Astro</a> &
<a class="transition link text-[var(--primary)] font-medium" target="_blank" href="https://github.com/saicaca/fuwari">Fuwari</a>
<br>
+ <a class="transition link text-[var(--primary)] font-medium" + target="_blank" href="https://beian.miit.gov.cn/">
+ 辽ICP备2023010881号-1</a> // 添加备案信息
</div>
+ <script type="text/javascript">function runtime(){const t=new Date("07/01/2023 08:00:00"),n=new Date,s=n-t,e=Math.floor(s/1e3),o=Math.floor(e/86400),i=Math.floor(e%86400/3600),a=Math.floor(e%3600/60),r=e%60;document.getElementById("runningtime").innerHTML=`⭐ 本站已运行: ${o}天${i}小时${a}分${r}秒 ☁️`}setInterval(runtime,1e3)</script>
+ <div class="transition text-50 text-sm text-center hidden md:block"><p id="runningtime"> </p></div> // 添加博客运行时间
</div>2、添加友链页面
1. 添加友链页面文件
在src/content/spec目录下新建文件friends.md
# 友链申请规则

欢迎大佬们添加友链,目前有以下几个要求:

- 您的站点在大陆地区需能正常访问,同时能维持站点的稳定运行。
- 您的网站需要有可读的内容,不接受空壳网站的友链。
- 如站点有头像,请保证图片能长期稳定地打开。
- 您的站点需要保持本站的友链。
- 您的站点不可含有违规的内容。

请在您的网站添加我的友链后,将您的网站信息发送至我的邮箱
我的邮箱为:[email protected]
友链格式如下:

    title: "imxizhenのBlog",
    imgurl: "https://q1.qlogo.cn/g?b=qq&nk=89525295&s=640",
    desc: "爱国 敬业 诚信 友善",
    siteurl: "https://www.imxizhen.asia",

# 本站的友链信息

- 名称:imxizhenのBlog
- 描述:爱国 敬业 诚信 友善
- 地址:[https://www.imxizhen.asia](https://www.imxizhen.asia/)
- 图片:https://q1.qlogo.cn/g?b=qq&nk=89525295&s=640

# 已过期的友链

Tip: 长时间无法打开、多次复查已不符合要求的网站会被移动到此处。
若您的域名有变动,可以留言更新;若网站已恢复且仍有本站友联,我将会在发现后第一时间移回上方。
NOTE
这个文件是新友链页面的内容文件,类似于其他页面内容(例如关于页面)来源的 about.md 文件。 添加这个文件的目的是为 “友链” 页面提供对应的内容数据,也便于通过统一方式调用内容。
在src/types/config.ts文件约37行位置添加以下内容
export enum LinkPreset {
  Home = 0,
  Archive = 1,
  About = 2,
+ Friends = 3,
}
NOTE
定义一个新的导航链接 “Friends”。在项目结构中,LinkPreset 枚举可能用于统一管理网页导航条或特定页面布局,对应页面的标识。
2. 国际化i18n翻译
在src/i18n/i18nKey.ts文件约35行位置添加以下内容
    author = "author",
    publishedAt = "publishedAt",
    license = "license",
+   friends = "friends",
NOTE
i18nKey.ts 文件负责国际化功能,这里添加了 friends 键值,表示新页面 “友链” 的国际化字符串键。 后续会根据项目支持的语言为 friends 提供不同语言的翻译。
按照自己的语言,在 src/i18n/languages 目录中编辑相应语言文件,以 zh_CN.ts 为例,在约 38 行位置添加内容
  [Key.author]: "作者",
  [Key.publishedAt]: "发布于",
  [Key.license]: "许可协议",
+ [Key.friends]: "友链",
NOTE
编辑语言文件,为新增的 friends 翻译字符串提供对应语言的翻译(这里是中文:友链)。 如果项目支持其他语言,这个步骤需要在每个语言文件中添加 friends 的翻译,保证页面多语言显示功能。
简中(zh_CN.ts)
       [Key.friends]: "友链",
简繁(zh_TW.ts)
       [Key.friends]: "友鏈",
英文(en.ts es.ts)
       [Key.friends]: "Friends",
日语(ja.ts)
       [Key.friends]: "友リンク",
韩文(ko.ts)
       [Key.friends]: "우정 링크",
泰语(th.ts)
       [Key.friends]: "ลิงก์เพื่อน",
在 src/constants/link-presets.ts 文件约 18 行位置添加内容
    [LinkPreset.Archive]: {
        name: i18n(I18nKey.archive),
        url: "/archive/",
    },
+   [LinkPreset.Friends]: {
+       name: i18n(I18nKey.friends),
+       url: "/friends/",
+   },
NOTE
在 LinkPreset 到页面路径的映射中,加入新的友链页面配置。 name 设置链接名称,这里使用国际化 i18n(I18nKey.friends) 来确保多语言支持。 url 指定这个页面的路径 /friends/。
3. 在导航栏中添加友链页面
在 src/config.ts 文件约 39 行位置添加内容,注意要在 LinkPreset.About 末尾添加,
export const navBarConfig: NavBarConfig = {
  links: [
    LinkPreset.Home,
    LinkPreset.Archive,
    LinkPreset.About,
+   LinkPreset.Friends,
    {
NOTE
navBarConfig 用于配置页面的导航栏。 在导航栏中添加新的 “友链” 入口,使用户能够通过导航直接访问这个页面。
4. 创建和配置页面的Astro文件
在src/pages目录下新增friends.astro文件
---

import MainGridLayout from "../layouts/MainGridLayout.astro";

import { getEntry } from "astro:content";
import { render } from "astro:content";
import Markdown from "@components/misc/Markdown.astro";
import I18nKey from "../i18n/i18nKey";
import { i18n } from "../i18n/translation";

const friendsPost = await getEntry("spec", "friends");

if (!friendsPost) {
        throw new Error("Friends page content not found");
}

const { Content } = await render(friendsPost);

const items = [
	{
		title: "Astro",
		imgurl: "https://avatars.githubusercontent.com/u/44914786?s=48&v=4",
		desc: "The web framework for content-driven websites. ⭐️ Star to support our work!",
    siteurl: "https://github.com/withastro/astro",
		siteurl: "https://github.com/withastro/astro",
		tags: ["框架"],
	},
	{
		title: "时歌的博客",
		imgurl: "https://blog-1302893975.cos.ap-beijing.myqcloud.com/pic/avatar.webp?imageSlim",
		desc: "理解以真实为本,但真实本身并不会自动呈现",
		siteurl: "https://www.lapis.cafe",
		tags: ["博客"],
	},
	{
		title: "imxizhenのBlog",
		imgurl: "https://q1.qlogo.cn/g?b=qq&nk=89525295&s=640",
		desc: "爱国 敬业 诚信 友善",
		siteurl: "https://www.imxizhen.asia",
		tags: ["博客"],
	},
]

---
<MainGridLayout title={i18n(I18nKey.friends)} description={i18n(I18nKey.friends)}>
    <div class="flex w-full rounded-[var(--radius-large)] overflow-hidden relative min-h-32">
        <div class="card-base z-10 px-9 py-6 relative w-full ">
            <div class="grid grid-cols-1 sm:grid-cols-2 gap-x-6 gap-y-8 my-4">
                {items.map((item) => (
                    <div class="flex flex-nowrap items-stretch h-28 gap-4 rounded-[var(--radius-large)]">
                        <div class="w-28 h-28 flex-shrink-0 rounded-lg overflow-hidden bg-zinc-200 dark:bg-zinc-900">
                            <img src={item.imgurl} alt="站点头像" class="w-full h-full object-cover">
                        </div>
                        <div class="grow w-full">
                            <div class="font-bold transition text-lg text-neutral-900 dark:text-neutral-100 mb-1">{item.title}</div>
                            <div class="text-50 text-sm font-medium">{item.desc}</div>
                            <div class:list={["items-center", {"flex": true, "hidden md:flex" : false}]}>
                                <div class="flex flex-row flex-nowrap items-center">
                                    {(item.tags && item.tags.length > 0) && item.tags.map((tag,i) => (
                                    <div class:list={[{"hidden": i==0}, "mx-1.5 text-[var(--meta-divider)] text-sm" ]}>
                                        /
                                    </div>
                                    <span class="transition text-50 text-sm font-medium">
                                        {tag}
                                    </span>))}
                                    {!(item.tags && item.tags.length > 0) && <div class="transition text-50 text-sm font-medium">{i18n(I18nKey.noTags)}</div>}
                                </div>
                            </div>
                        </div>
                        <a href={item.siteurl} target="_blank" rel="noopener noreferrer"class="flex btn-regular w-[3.25rem] rounded-lg bg-[var(--enter-btn-bg)] hover:bg-[var(--enter-btn-bg-hover)] active:bg-[var(--enter-btn-bg-active)] active:scale-95">
                            <svg xmlns="http://www.w3.org/2000/svg" xmlns:xlink="http://www.w3.org/1999/xlink" aria-hidden="true" role="img" class="transition text-[var(--primary)] text-4xl mx-auto iconify iconify--material-symbols" width="1em" height="1em" viewBox="0 0 24 24">
                                <path fill="currentColor" d="M12.6 12L8.7 8.1q-.275-.275-.275-.7t.275-.7t.7-.275t.7.275l4.6 4.6q.15.15.213.325t.062.375t-.062.375t-.213.325l-4.6 4.6q-.275.275-.7.275t-.7-.275t-.275-.7t.275-.7z"></path>
                            </svg>
                        </a>
                    </div>
                ))}
            </div>
            <Markdown class="mt-2">
                <Content />
            </Markdown>
        </div>
    </div>

</MainGridLayout>
NOTE
创建 friends.astro 作为友链页面的模板文件,复制使用了类似 about.astro 的结构代码。 修改了内容获取函数,使其加载的是 friends.md 数据,而非 about.md 数据。 修改了标题 title 和描述 description,指向 friends 的国际化字符串。
在
friends.astro文件中,添加卡片效果的友链信息,包括站点名称、头像、描述、链接、标签等信息。
const items部分就是添加的友链部分,继续添加即可。
最终效果

3、添加评论系统
本主题作者未来会计划添加评论系统,但目前主题原生不支持,可采用giscus等第三方评论系统,本节就采用giscus来进行演示。
1. giscus配置
- 首先,你需要创建一个新的GitHub库用来“装下”博客的那些评论,你需要确保该仓库是公开的,否则访客将无法查看 discussion。
- 然后,你需要给你的这个仓库repo安装giscus app,否则访客将无法评论和回应。
- 最后,你需要确保 Discussions 功能已在你的仓库中启用。
打开giscus官方网站https://giscus.app/,进行配置:
- 语言:选择你目前正在使用的语言(一般应该都是简中吧?)
- 仓库:填写你刚刚创建的仓库(格式为
你的用户名/仓库名) - 页面 ↔️ discussion 映射关系(默认即可)
- Discussion 分类(默认即可)
- 特性(默认即可)
- 主题(默认即可)
按照顺序配置好之后,下方会自动生成
具体字段会根据你的情况自动生成
<script src="https://giscus.app/client.js"
        data-repo="[在此输入仓库]"
        data-repo-id="[在此输入仓库 ID]"
        data-category="[在此输入分类名]"
        data-category-id="[在此输入分类 ID]"
        data-mapping="pathname"
        data-strict="0"
        data-reactions-enabled="1"
        data-emit-metadata="0"
        data-input-position="bottom"
        data-theme="preferred_color_scheme"
        data-lang="zh-CN"
        crossorigin="anonymous"
        async>
</script>
2. 添加评论系统到页面
2.1 友链页面
如果你的友链界面已经配置好,直接在src/pages/friends.astro文件中添加即可,插入最后一行'</MainGridLayout>'上方即可
            <Markdown class="mt-2">
                <Content />
            </Markdown>
        </div>
    </div>

<!-- giscus评论 -->
<script src="https://giscus.app/client.js"
        data-repo="xxx/xxxx"
        data-repo-id="xxxxxxxxx"
        data-category="Announcements"
        data-category-id="xxxxxxxxxxxx"
        data-mapping="pathname"
        data-strict="0"
        data-reactions-enabled="1"
        data-emit-metadata="0"
        data-input-position="top"
        data-theme="preferred_color_scheme"
        data-lang="zh-CN"
        crossorigin="anonymous"
        async>
</script>

</MainGridLayout>
2.2 文章页面
找到 src/pages/posts/[...slug].astro 文件 在'</MainGridLayout>'行上方添加即可
                <Icon name="material-symbols:chevron-right-rounded" class="text-[2rem] text-[var(--primary)]" />
            </div>}
        </a>
    </div>

<!-- giscus评论 -->
<script src="https://giscus.app/client.js"
        data-repo="xxx/xxxx"
        data-repo-id="xxxxxxxxx"
        data-category="Announcements"
        data-category-id="xxxxxxxxxxxx"
        data-mapping="pathname"
        data-strict="0"
        data-reactions-enabled="1"
        data-emit-metadata="0"
        data-input-position="top"
        data-theme="preferred_color_scheme"
        data-lang="zh-CN"
        crossorigin="anonymous"
        async>
</script>

</MainGridLayout>

<style is:global>
#post-container :nth-child(1) { animation-delay: calc(var(--content-delay) + 0ms) }
#post-container :nth-child(2) { animation-delay: calc(var(--content-delay) + 50ms) }
#post-container :nth-child(3) { animation-delay: calc(var(--content-delay) + 100ms) }
#post-container :nth-child(4) { animation-delay: calc(var(--content-delay) + 175ms) }
#post-container :nth-child(5) { animation-delay: calc(var(--content-delay) + 250ms) }
#post-container :nth-child(6) { animation-delay: calc(var(--content-delay) + 325ms) }
</style>
NOTE
关于页面,归档页面同理,修改对应的如
about.astro,posts.astro,archive.astro,index.astro,即可
CAUTION
因为在@时歌实际使用过程中,发现评论系统在页面的位置比较靠上,和文章正文贴得太近不美观,因此
时歌修改了下实际代码:<!-- giscus评论 --> <div style="margin-top: 20px;"></div> <script src="https://giscus.app/client.js" data-repo="xxx/xxxx" data-repo-id="xxxxxxxxx" data-category="Announcements" data-category-id="xxxxxxxxxxxx" data-mapping="pathname" data-strict="0" data-reactions-enabled="1" data-emit-metadata="0" data-input-position="top" data-theme="preferred_color_scheme" data-lang="zh-CN" crossorigin="anonymous" async> </script>